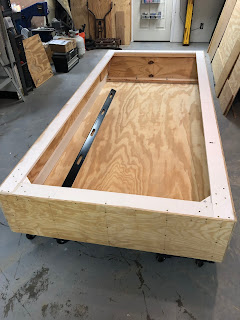
Anyway, back to the basement. Originally my plan for the mini was to mount it on a 4' x 8' utility trailer that belonged to my father in-law. My son and I drug it up out of the woods and stripped her down to the metal. In the mean time, I was also starting the build in the basement of our home. Sometime between pulling the old utility trailer out of the woods, picking up the perfect piece of 3/4" plywood for the floor and rearranging my shop, I came across yet another DIY camper build on Pinterest. This was a bit of a unique build as the guy built his on a 4' x 8' but he raised and widened his sleeping area. I wasn't really impressed with how he did it, more impressed with the idea. Well, back to the drawing board.
Note in the photo above and the photo below the rear piece of plywood set on a 45 degree angle is a thicker piece of plywood. 3/4" in fact. This is intentional for two reasons. First I wanted the extra structural strength at the rear of the mini and second, I may mount a spare tire and portable fire ring in that area. I have not decided on that just yet but the structure and strength will be built in if I decide to.
The bottom cross member and top cross member are ripped 2" x 4" pieces of lumber carriage bolted and liquid nailed all the way through the 3/4" plywood. Top and bottom. I will cut off the extra bolt once I decide that nothing else needs to be connected to them.
It is pretty hard to see and you may be wondering so I will explain the best I can. When I added on the extra 12" to the length of the basement, I used 3/4" plywood as backing. The backing extents 12" towards the front of the basement and 12" towards the back of the basement. It is glued and screwed laminating it all together for extra strength. The side wall is over an inch thick in this area. I kept that triangle (wedge) clear of screws on purpose as this area on both sides will have electrical ports for the 50 amp / land power cord. I told ya'all, I been think'n bout this for a long time.
The two photos above are of the exterior of the "Basement"walls as well as the rear bulkhead all glued and screwed together.
It is now time to move the mini's "basement" to the floor. In doing so in my limited space, it needed to be mobile. I picked up those four small furniture movers at Harbor Freight on sale for $7.99 each. WELL worth the investment as they have worked perfect throughout the build. I can literally move the mini anywhere it will fit in my space.
So there you have it. Close to 36 cubic feet of space that will be under the sleeping floor. This is how the mini's basement evolved and was constructed. I have not decided on the next post yet. I have so much to share about this process and I want to do it in an order that makes most sense. I have a few more details regarding the basement, but I will wait until we get there so as not to be to confusing. Lots more coming.
#minicamptrailer #diycamptrailer #1stCutMini-CampTrailers #offroadtrailer


Every trailer needs a basement. What a good idea.
ReplyDelete