Tuesday, July 2, 2019

Secret RV Salvage Yard A Mile Away.

Sometimes the best kept secrets are just around the corner. In my case, just around the corner and down the road a piece. Nonetheless (always curious why nonetheless is one word) while skimming through CraigsList and searching for wrecked RV's or motorhomes in our area that someone might be parting out, I actually came across an RV Salvage Yard. Now, I am not talking about one in another state or across the state or in an unknown county 90 miles away. This RV Salvage was in my own town. NOT across town, literally about a mile and a few feet from my front door.

Though some of you may be wondering, I'm sure some of you know exactly why I was looking for a wrecked RV to salvage from. So here is for the wonderers. As I was preparing for this build and buying lumber and hardware. I also started looking into ordering new windows, doors, lights etc. I must say, I was a bit shocked at the prices I found. Especially when it came to windows. It was almost a deal breaker for me. Here is an example. One NEW 18" x 20" Tinted, sliding window with sliding screen, cost anywhere from $295.00 to $350.00 each. So lets just say $315.00. Now lets multiply that by 4. This would include one window for each side of the mini set into the body as well as one window in each door, one door on each side of the mini. That is a WHOPPING total of $1,260.00 plus tax, just for windows. I often have wondered how there are so many claims of building a mini for one or two thousand dollars ? ? ? Not to say it can't be done. I just can't do it for those costs the way I'm building our mini.

Well, I have driven past this place around the corner a million times and always just assumed it was a "Store-Your-Stuff-Here" which in fact it actually is, as well as a salvage yard. The trailers I could see way in the back just seemed to be the typical stored RV's that you see all the time at such places but in fact were wrecked RV's to be salvaged. In reality this was, is and has been an RV salvage yard for many years. When I called and asked about windows, they said "You would be better off just stopping by to find what your looking for, cuz I'm sure we'll have it." Can you give me an idea on cost? I asked. "It depends on what you find, but I'm sure you won't be disappointed" they told me.

When you happen upon an RV Salvage Yard in your own backyard, don't call the place on a Wednesday afternoon like I did, especially knowing that you will not be able to possibly stop by there until Saturday. The anticipation just might kill ya.

Saturday finally rolls around and I'm up early driving through McDonalds for an ice coffee and sausage burrito. I've got a couple hundred bucks cash in my pocket in hopes for at least one window now and a few other odds ends that I need to continue on with the mini build. I pull into the gravel parking lot. I'm early, the only car there. I get out with great anticipation and walk up to the front of the building. I cup my hands on either side of my face to peer through a dirty window. I can only imagine that I looked like a child gazing through the glass of a candy store . I could not believe the things I was seeing. There was also a guy, maybe in his late thirties sitting behind one of those fold out plastic tables talking on a cell phone. He waved a motion for me to come on in. I stepped through the door and directly into RV Salvage Paradise.

Geral introduced himself to me and remembered talking to me on the phone three days earlier about windows. He takes me out to the back area and into the "pole barn" part of the building that you can not see from the road. To be perfectly honest, I simply could not believe what I was looking at. It was thousands of salvaged RV parts and windows, RV furniture and appliances, RV hatch doors of every size, some big enough to drive a four wheeler through. RV water heaters, bathroom fixtures, RV cabinets and countertops, TV antennas and satellite dishes.  I could go on and on. You name it, Geral has it.

He points to two different locations of windows standing on end. He says, "pull out what you want and look around for what ever else you think you might need, I'll be back in a bit, I have to go help this fella that just pulled up with his toy hauler." He turns back towards me and says, "if you don't find what you are looking for in here, we can remove anything on the wrecked RV's out there."

Are you picturing this? I'm standing in the "Cabella's" of the RV salvage world and all I have in my pocket is a measly two hundred bucks! 

Well, long story short, on my first visit, not only was I able to buy all the windows that I needed, but I also purchased a keyed exterior hatch access door and a table pedestal with two pedestal sockets. When Geral returned and gazed upon my treasure of parts, he says, "I'm gonna have to get $195.00 for all that."Without question I handed him the $200 cash ($10's-$20's) from my pocket. Without even counting it he lays it on the plastic fold out table and reaches into his pocket for a roll of cash, he peels back a $5, hands it to me. Adds my former $200 to his roll and puts it all back into his pocket.


Above and below are the tinted, sliding windows with sliding screens I chose.


Below is the table pedestal and two sockets I also got at the RV salvage. Look closely and Geral even threw in the mounting screws. I will talk more about the table later.


Below is the keyed exterior access hatch. Since the 6000 BTU air conditioning unit will be installed in the rear galley area, it will still need to exhaust to the outside of the mini. This hatch will be a door mounted within the passenger side rear galley door and provide an exhaust port even if I have the galley doors closed and locked. More about this later.  


On my second visit I got most of the 12v DC on/off switches for lights, fans etc. as well as the 120v AC plugs. I had the choice between black, white and bone color. I chose black. The total price paid for these items was $18.00. Note that RV Plug Receptacles are not as deep as standard household receptacles. These specialty receptacles are of the "grabber" type and the wire connections to the receptacle are covered and shielded. This means that they will mount in a VERY narrow wall without a receptacle box or junction/switch box. They are actually a very cleaver fixture and they seem safe.


Above is one of the black 12volt DC switches and plates. I started with eight of them. Below is the 120volt AC plug receptacles. At the bottom left of the photo, do you see that screw an little tab or wing? There is one located there and one located at the top of the opposite side. When you tighten down those screws, the tabs/wings flip out and sandwich the wall between the receptacle and the tab/wings. The wiring goes up into the back of the receptacle and once screwed into place a plastic cover, covers up the wire connections. Ingenious actually.


The savings from just the windows alone is why I was able to make the decision to purchase a brand new 5' x 8' trailer from Tractor Supply opposed to the 4' x 8' trailer we pulled out of the woods.

Monday, June 24, 2019

Lets Get Back To Building

The basement box has become the foundation of the entire build. Taking that into consideration, I have beefed up the structure of the basement box. I mentioned the angle steel under the sleeping floor in the last post. Remember? The angle steel was salvaged out of some old electronics tower I found sitting around. The cost was $0.00. Here is an actual photo. Notice the holes and slots? The holes may come in useful in the future to connect to, hang to, or strap to.


__________

The basement is 9' long x 4' wide. x 12" deep. This posses a bit of a problem when it comes to the next step which is cutting and building the sleeping deck or floor of the mini. Back in the post called "On Our Own Terms" I mentioned that we currently sleep in a queen size bed. This means that the sleeping deck needs to be a finished 5' wide. Well, 3/4" plywood does not come 5' wide. In this case, "a bit of a problem" translate to costs a little more money because I needed to purchase two more pieces of 3/4" plywood and cut them to the length I needed. NOT TO WORRY though, you will find a use the 3' x 4' cut off elsewhere. You will actually be glad you have those pieces.


This is the first piece of 4' x 5' 2" sleeping deck. The view is from the front or tow end of the mini. 

This is the second piece of 4' x 5' 2" sleeping deck. Same view as above.


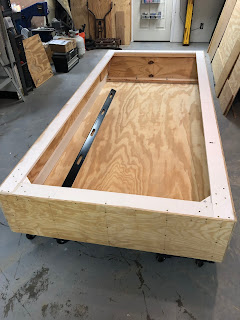
This is both pieces of sleeping deck centered up on the mini. Once the walls go up the finished inside dimension will be 5'- 3/8" x 7' 11-7/8". The primed white framework you see in the photo is the foundation to the exterior galley. It will be sheeted with 3/4" plywood as well. In the last post I mentioned that you would be happy that you had the extra cutoffs from the sleep deck. Well, this is one of those happy moments

__________

In the photos below I have made a model of the exterior 1/2" wall, the 1/4" interior wall, the 3/4" white primed stud and the 3/4" x 2" wall base plate. This model allows me to move it around the edges of the sleeping deck to check alignments and make certain that things stay square. The few minutes it took to build the model has proved to be an invaluable tool.
The above and below photo shows how I use this fabricated wall model to keep all my measurements in check. This enabled me to pencil mark the sleeping deck exactly where walls would sit and then write myself notes between the lines to remind me what to glue and screw permanently and what not to. This view is the front (tow end) bulkhead.


This is the model being used at the rear (galley end / passenger side).
__________

The next step was cutting in the two hatches to gain access into the mini's basement storage area through the sleeping deck. This needs to be precise and follow the framework or floor joice if you will. Doing so allowed me to head off the opening between and around the joice so the hatches do not fall through.
  

I screwed these pieces of 1/2" scrap plywood in place so as I cut the hatch opening the 3/4" plywood would not get in a bind or fall into the basement.


In the photo above you can see how I headed off the opening so the piece of sleeping deck that I cut out fits back into the opening for a nice sturdy deck.

__________

These two access points will also allow us to set up a removable table pedestal down onto the basement floor and sit on the edge of the opening with our feet on the basement floor. We can use the table to eat, play backgammon or use a laptop. You will see more about this as we move forward.   


#minicamptrailer #diycamptrailer #1stCutMini-CampTrailers #offroadtrailer


Friday, June 21, 2019

"What Materials I Used and Why"

Here's the thing. I like what I like and loyalty is important. The things I like usually come from a good experience I have had. What I have found to be true also is, a bad experience reinforces why I stay loyal to the good experiences (Hmm, that might make a good T-shirt). So I will just say it. I prefer to shop at Lowe's Home Center. They cater to the customer, they have quality materials, everyone is friendly, they have a no questions asked policy on returns and for those of you that this matters to, they are dog friendly. Another important factor is they always have what I am looking for or something better than I expected. This has not been my experience at other box home type stores.


3/4" Exterior Finished On One Side Plywood for the flooring of both the "basement" floor and the sleeping floor. Maybe an overkill but we do not want any bending of flexing.


1/2"" Exterior Finished On One Side Plywood for the exterior sub-walls, front and rear bulkheads. I have seen it done with 1/4" and 3/8" but we want the strength.


1" x 2" , 1" x 4" , 1" x 6" , 1" x 8" and 1" x 12" primed pine for wall, ceiling and structural framing. I can not say enough about this lumber. It is nicely primed, the boards are straight and true and they are clear of knot holes and flaws. They call it pine but I have been getting quite a bit of poplar in the mix. Cuts nice and easy to work with. Love this stuff. It is rated for exterior too. I am using this for 99% of the framing.


1/4" Clear Laminate underlayment (Finished On Both Sides) for the finished interior walls, bulkheads and ceiling. This is another product that I like to work with. It is typically used for the smooth clean surface it give you under vinyl and laminate floor installations. The grain in beautiful and it is clear and flawless. It also takes stain or paint well.


2" x 4" kiln dried lumber for structural support. Specifically in the rear of the mini and the rear galley area. Kiln dried because the are straight and true and they typically stay that way. Pick ones that are as clear of knot holes and flaws as possible.


4' x 8' sheets of white, gray, bone or black Fiberglass Reinforced Plastic (FRP) for the final cover of all exterior wood surfaces including the bottom of the mini and the roof. FRP is a great, tough, easy to work with material. It is 100% waterproof and I like the looks of it. We are most likely going to do a combination of white and gray on our mini.


3/4" & 1" x 4' x 8' sheets of rigid green dense foam insulation for all of the exterior walls, bulkheads and ceiling. I will be insulating with this between the walls, bulkheads and bottom of the sleeping floor with this product. I think the reasons for insulation are obvious. 


For those of you that are "in the know" about such things, The Pink comes from another Big Box Home Store. I know, I know. I said just a few lines up in this post that Lowe's was my place of preference. It still is.


Coated Star Drive Deck Screws ranging from 1/2" to 2-1/2" for all joining of wood to wood surfaces including the 1/4" Clear Laminate interior walls and ceiling. I am using coated because the are just a better screw and they do not tear your fingers up as badly as regular drywall type screws.


Liquid Nail, Elmers Carpenters Wood Glue and FRP Adhesive. One or the other used at EVERY joint, where two pieces of wood come together, are joined together or are laminated one to the other. I don't want leaks and I would prefer no squeaks.


1/8" Thick x 1-1/4" x 3" x 10' salvaged angle steel used to support the 3/4" plywood sleeping floor at two critical points. Salvage is a good thing and I highly recommend it. In a future post I will tell you how and were I got all the windows, hatch doors, 12volt switches and other cool stuff for very little money.


Satin Finish Urethane will be coated by brush or roller over ALL raw wood surfaces on the interior and the exterior of walls, bulkheads, ceilings as well as the galley area prior to foam insulation, finish painting, FRP skinning and carpet/vinyl/laminate flooring. In other words, all of the constructed wood will have at least one coat of Polyurethane coating it. The inside of all the walls will be coated before the final finished wall is installed. Numerous coats will be applied around window and door openings prior to the actual windows or doors are installed. 


Durman's Wood Filler and Bondo Auto Body Filler will be used one or the other or both for all counter-sunk screw heads and butt-joints on the exterior walls and roof prior to the installation of the FRP. I have used both of these products on woodwork before and they are superior for sanding and shaping. Durham's takes paint and stain well. BONDO take paint well, stain, not so much.


These are the major materials that I have been purchasing in preparation for the mini build. Of course there is other hardware I have used or will be using, but I'm not really going to go into the weeds with all of that. If something special pops up I will be sure to mention it.


#minicamptrailer #diycamptrailer #1stCutMini-CampTrailers #offroadtrailer
 

Thursday, June 20, 2019

Yup. . . I Have A New Plan For The Utility Trailer!

After a lot of thought and consideration, I have a new plan as it pertains to the 4' x 8' utility trailer. Although I am building the mini to fit exactly onto the utility trailer that I have, I've decided to bump it up a notch and purchase a new 5' x 8' utility trailer. Two reasons. First, I believe the weight of the our mini build is going to be really close to the gross vehicle weight (GVW) of the trailer that my son and I pulled up out of the woods, even after the modifications that I have made with 12" rims and heavier leaf springs. I do not know this to be for sure, but I do not want to take the chance. Second, the 5' x 8' utility trailer has even larger rims (13") and tires as well as the axel is set back further than my 4' x 8'. I believe that the set back of the axel is going to also lighten the load of the tongue weight. To be perfectly honest, I am also a little excited about the six inches of clearance on the trailer bed at each side, between the "basement" wall and the fenders. I'm thinking maybe a couple of 6" x 8' watertight tubes for fish'n rods, decorative rolled ground matt, tarp poles or something like that.


This is the original 4' x 8' utility trailer we pulled out of the woods. The GVW of this trailer is 1000 pounds.


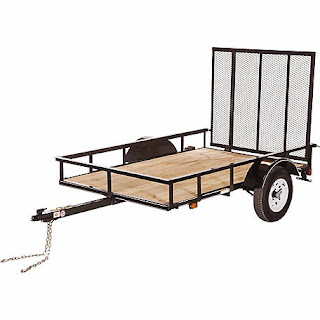
This is the trailer I have chosen. My local Tractor Supply currently has it on sale for $849.00. I am going to watch the price though as it goes on and off sale for as low as $750.00. This same model with the mesh floor opposed to the wood plank floor sells for as low as $650.00. Both have a GVW of 2000 pounds. The mini will not weigh that much, I am sure. I am going to remove the mesh fold down ramp and hinges barrels. I will then cut the removed ramp into the desired size, weld on some angle iron, and reinforcing steel to make a tongue shelf on the tow end. This could house an ice chest or generator, battery box, propane tank and possibly a spare trailer rim & tire. 

#minicamptrailer #diycamptrailer #1stCutMini-Camp-Trailers #offroadtrailer

Tuesday, June 18, 2019

The "Basement"

My original ideas and drawings were based on more of an "off-road" style mini-camper. Style being the key word here. Just to be clear, I am not an off-roader although I think the off-road trailers are cool has heck and follow a few off-road camper Bloggers. Our mini will be built to handle off-road but my current trailer plans will not. The off-road rigs are well thought out with a place for everything. With all of them, off-road campers, tear drops, Mini-Trailers, pop-ups and Tiny Houses, storage seems to be of most importance. Not just storage for useless stuff like we have stored in out attics and basements at home, but useful things like fish'n rods, kayak and bicycle gear, screened in pop-ups, camp'n gear, stoves, lanterns and shoot'n stuff (We love shoot'n guns). Ya know, important things like that.

Anyway, back to the basement. Originally my plan for the mini was to mount it on a 4' x 8' utility trailer that belonged to my father in-law. My son and I drug it up out of the woods and stripped her down to the metal. In the mean time, I was also starting the build in the basement of our home. Sometime between pulling the old utility trailer out of the woods, picking up the perfect piece of 3/4" plywood for the floor and rearranging my shop, I came across yet another DIY camper build on Pinterest. This was a bit of a unique build as the guy built his on a 4' x 8' but he raised and widened his sleeping area. I wasn't really impressed with how he did it, more impressed with the idea. Well, back to the drawing board.


Instead of building four foot walls up off of the floor, I brought the wall up to 12". Remember the 45 degree cut in the rear? (See the post just before this one to refresh your memory). In the photo above and the photo below you will see how I extended the 4' x 8' base(ment) to 9'. I did this to give us more room inside the mini but still wanting it to fit on a 4' x 8' utility trailer.


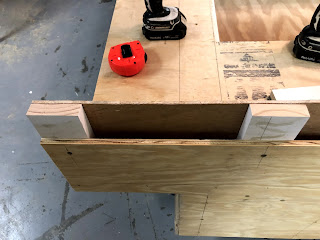
This photo gives you a side view of the base(ment) of the mini. Remember when I made the first cut and removed a 1" x 8' piece of the base? Well, when I added the 3/8" plywood side walls overlapping the edge of the 3/4" plywood base, the width measurement changed from 3'-11'  to 3' 11-7/8" exactly. Now when I adhere the FRP to the bottom, I will have to use a trim router to trim the FRP to a perfect fit.


Note in the photo above and the photo below the rear piece of plywood set on a 45 degree angle is a thicker piece of plywood. 3/4" in fact. This is intentional for two reasons. First I wanted the extra structural strength at the rear of the mini and second, I may mount a spare tire and portable fire ring in that area. I have not decided on that just yet but the structure and strength will be built in if I decide to. 


The bottom cross member and top cross member are ripped 2" x 4" pieces of lumber carriage bolted and liquid nailed all the way through the 3/4" plywood. Top and bottom. I will cut off the extra bolt once I decide that nothing else needs to be connected to them.


It is pretty hard to see and you may be wondering so I will explain the best I can. When I added on the extra 12" to the length of the basement, I used 3/4" plywood as backing. The backing extents 12" towards the front of the basement and 12" towards the back of the basement. It is glued and screwed laminating it all together for extra strength. The side wall is over an inch thick in this area. I kept that triangle (wedge) clear of screws on purpose as this area on both sides will have electrical ports for the 50 amp / land power cord. I told ya'all, I been think'n bout this for a long time.


The two photos above are of the exterior of the "Basement"walls as well as the rear bulkhead all glued and screwed together. 


It is now time to move the mini's "basement" to the floor. In doing so in my limited space, it needed to be mobile. I picked up those four small furniture movers at Harbor Freight on sale for $7.99 each. WELL worth the investment as they have worked perfect throughout the build. I can literally move the mini anywhere it will fit in my space.  


So there you have it. Close to 36 cubic feet of space that will be under the sleeping floor. This is how the mini's basement evolved and was constructed. I have not decided on the next post yet. I have so much to share about this process and I want to do it in an order that makes most sense. I have a few more details regarding the basement, but I will wait until we get there so as not to be to confusing. Lots more coming.

#minicamptrailer #diycamptrailer #1stCutMini-CampTrailers #offroadtrailer

Monday, June 17, 2019

Where Does One Start?

Here is how I/we started. As long as several years back we have been purchasing materials, hardware, lumber, plywood and underlayment. We have even been purchasing other items really not related to the build itself, but things we know we will need to outfit the Mini-Camper with, once it is completed. Our idea and one that has always worked well for us, is to purchase things we will be using for a project as we can PRIOR to or in the planning stages and then for other materials as we go. This makes it not such a financial burden. Works for us anyway.

After the years of research, planning, sketching etc. we had a REAL good idea of what we wanted the trailer to look like. Of course there will and has been changes along the way. A good example of that is the 4' wide x 9' long x 12" deep storage area under the floor of the entire camper. It just seemed like a good idea and turned out better than I had hoped. WE now refer to this area as the basement. In the next post the basement will make more sense. Trust me.

I have a pretty large shop in the basement of our home, but it really was not set up for building a Mini-Camp Trailer. I had to rearrange things to make this work and give me the maximum amount of working space and still be able to use my table saw, miter saw, drill press as well as other hand and power tools. This was not a monumental issue but it did take more thinking and work than I anticipated.


The big area down the middle will be the construction area. It seems big enough to build build a 9' long x 5' wide x 5' high camper. Doesn't it? I will say that it has been challenging. 


So here here we go. . . the photo above is actually the very "First Cut" I made on the mini-camper build. You may be wondering why I cut a one inch wide and eight foot long to the 3/4" plywood base. There is good reason and you will just have to bare with me as we go, cuz I been think'n bout this for a LONG time. It has to do with the very end of the build. When the camper gets its final covering. I will be using Fiberglass Reinforced Plastic or FRP. It happens that FRP comes in 4' x 8' sheets unless I order it special. "Special"always translates to, COSTS MORE $$$. If my base materials, walls floors, bulkheads are 4' x 8' and I add one piece of material to another piece of material, like a wall to the floor for example, this will change the finished width, length or height. This would be a BIG problem when it comes time to skin the exterior toward the end of the build. If anything, I want to skin the exterior and have to use an edge/trim router to cut tight flush edges that will not allow moisture in. More on this subject later.


Please note the 1" x 12" primed white lumber and side rail framing materials. I will talk more about this in another post called "What Materials I Used and Why."

 
The photos above are the beginning of the basement. The top of these two photos is the front of the mini camper (the end closest to the tow vehicle) and the bottom photo is the rear of the mini.


This photo above is the detail of the rear bottom of the mini. That is a 45 degree cut just shy of the 8' length of the 3/4"plywood base. (Remember the FRP. I want everything to cover with not gaps). I cut the 45 into the plywood freehand with a skill-saw and the 45 onto the 2"x4" on a small table saw. The two pieces are then glued and screwed.


Every joint that is made between two pieces of wood is glued and screwed. The adhesive I am using is Liquid Nail and the screws are "coated" deck screws. Every screw hole is pilot drilled and counter sunk. All of that being said, remember, I am building this in my basement. I have to always be thinking about what gets glued and what gets screwed now and what get glued and what gets screwed later. Remember, what gets built in the basement, has to come back out of the basement. . . in pieces! Sheeeesh! This is proving to be most challenging for sure.

On the night of the first cut and the other photos above, I stayed down in the shop WAY TO LONG. As a matter of fact until just about 3:00am. I don't know about you, but when you are in your shop and the temperature is right, the music is right and then you combined all that with the smell of cut lumber, liquid nail and the sound of a cordless torque driver, its hard to walk away.

#minicamptrailer #diycamptrailer #1stCutMini-CampTrailers #offroadtrailer